
Whether you have opted for our web hosting, VPS hosting or simply want to transfer files from one host to another, it is very likely that you want to get straight into getting your files, applications and services all ready and setup onto your brand new host. In this guide, I will show you how to do just that!
I recommend using FileZilla and an archiver such as 7-Zip to not only make it easier to transfer your files, but to compress them too! FileZilla is an FTP client that will let you upload and download your content from the place of which it is stored.
This guide is intended for the use of EpicHosts clients, but should apply to most other default setups that handle data. This guide is assuming that you have a host already and that it is ready to take your data or can be administered by yourself to install the appropriate software for your access.
I will split up this guide into different sections, depending on the kind of host that you have, in order to try my best to offer the best advice for each kind of host that are generally available.
Please use the links below to jump to the relevant part of the tutorial for your requirements:
Retrieve Your Files
Download Files
Transfer Files to Web Hosting
Transfer Files to VPS Hosting (Windows)
Transfer Files to VPS Hosting (Linux)
If none of the sections apply to your kind of host, please look through the guide anyway to double-check if it may or may not apply to your setup, otherwise contact us directly to let us know of your setup so that we can alter this guide to try to offer the best advice for all types of hosts.
Retrieve Your Files
If you are not sure how to get the files off of your current host, it would be best to contact them directly. If you do not want to let them know you are moving host, you could ask them that you want to retrieve the files for backup purposes. They might have a whole different setup for backing up your data, which would effectively archive, compress and let you download your whole site at a click of a button!
If you cannot or do not want to contact your current host, you should be able to retrieve your files from a File Manager or through FTP. If it is a web host using cPanel, most of them offer these two applications mentioned above, and sometimes even a Backup application that can perform the whole site backup at a click of a button, mentioned above. If it is a VPS host, I recommend using FileZilla and an archiver such as 7-Zip to not only make it easier to transfer your files, but to compress them too! FileZilla is an FTP client that will let you upload and download your content from the place of which it is stored.
If in doubt, you can always contact us for assistance with transferring all your data safely and securely to our host - we will happily teach you how to do it, or do it for you at no extra charge! Contact us now using the 'Support' button at the top or the Live Chat button at the bottom-right.
Download Files
Quite possibly the easiest and quickest way to get files onto your host is by downloading them from the internet. You can get a direct download URL from a trusted source, for example if you were to download WordPress you would get the direct download URL from their official website, or you can upload your files onto a file sharing provider such as Google Drive, then download those files onto your host.
If you are using shared web hosting, you may not be able to download directly from a URL. You will need to check with your provider to see if they offer such a feature. Otherwise, you should check the 'Transfer Files to Web Hosting' section for alternatives.
If you are using a Windows VPS, you can download files from the web browser. If you are using a Linux VPS, or a web host with SSH capabilities, you can use the 'wget' command to download a file from a URL.
Transfer Files to Web Hosting
To transfer files to Web Hosting, I can recommend two ways of accomplishing this. If your web hosting comes with FTP access, I would recommend using this. Otherwise, you can use the built-in File Manager to upload your files and content..
FTP
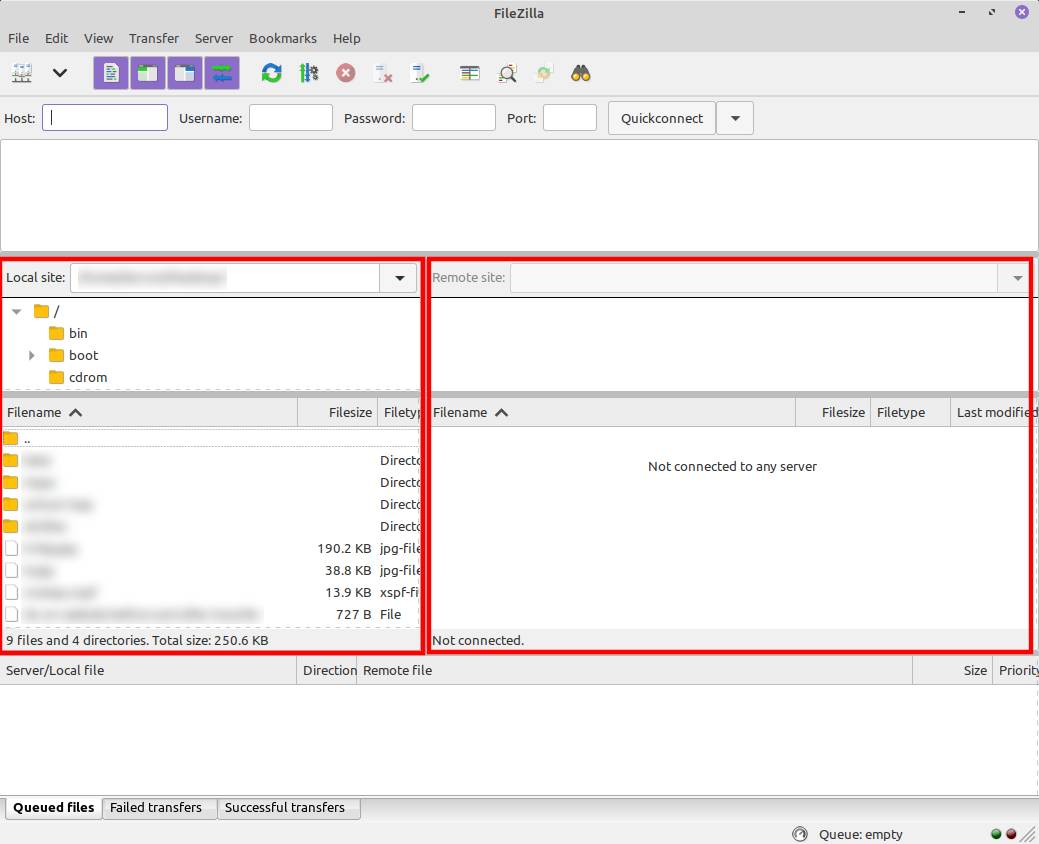
- To transfer files to Web Hosting through FTP, you will need to install an FTP client. I recommend FileZilla FTP Client as it is an easy-to-use FTP client and available for any OS. You can download it here: https://filezilla-project.org/download.php?show_all=1. Once you have it open, get familiar with the layout. The left pane will show you a Local site which show the files on the computer which you have installed FileZilla FTP Client onto, and on the right pane will show you the Remote site which will be your website content once you are logged in.
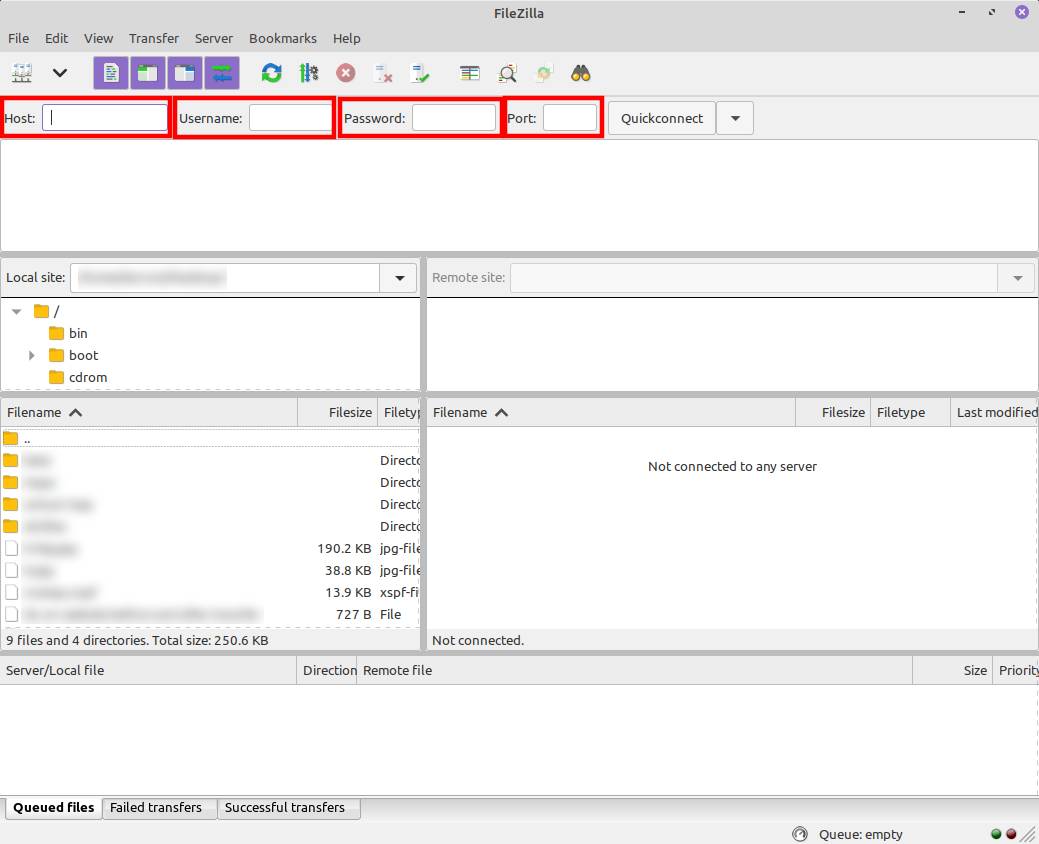
- You will also see a Host, Username, Password and Port field. You will need to find this information in order to login to the FTP Server of your current host. If you do not know this information, please contact your host requesting this information. You may need to create an FTP account from cPanel. Most of the time, you can use your cPanel username and password without issues. If you are unsure, always ask your host for help where possible!
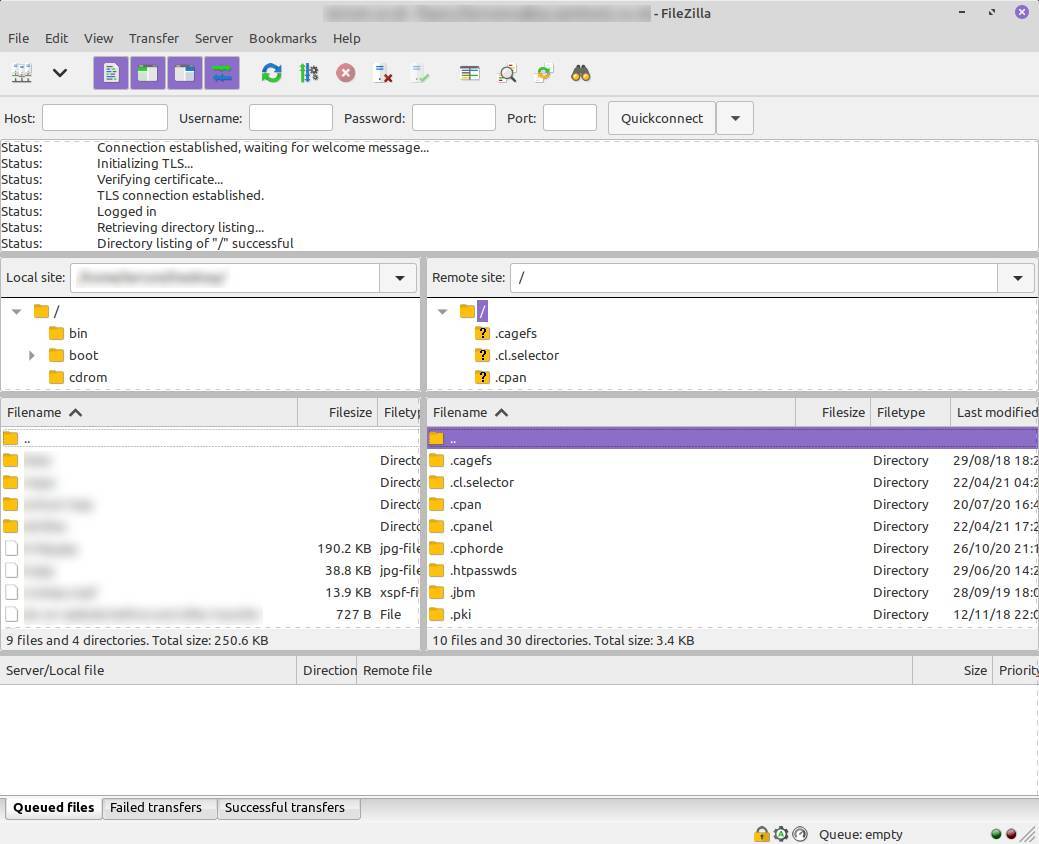
- Once you have successfully logged in to the FTP, simply select the files and folders you wish to download. To select more than one file, hold CTRL whilst clicking on all the files and folders you wish to download, and then right-click on any of the selected files and press Download. All the files will then download into the designated folder shown on the left pane.
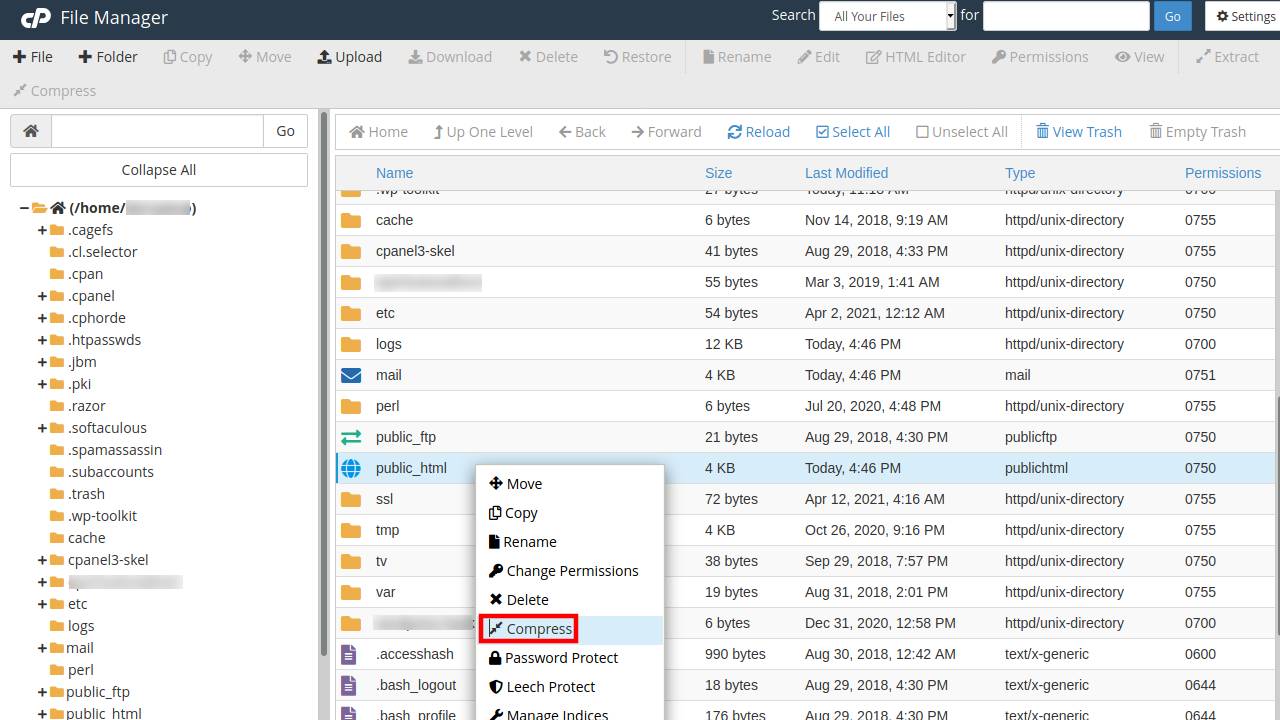
- If it takes too long, you may want to consider compressing the content first. If your host provides this feature through cPanel, you can achieve this by simply right-clicking on the files and folders you want to compress, and press 'Compress' from the File Manager after logging into cPanel.
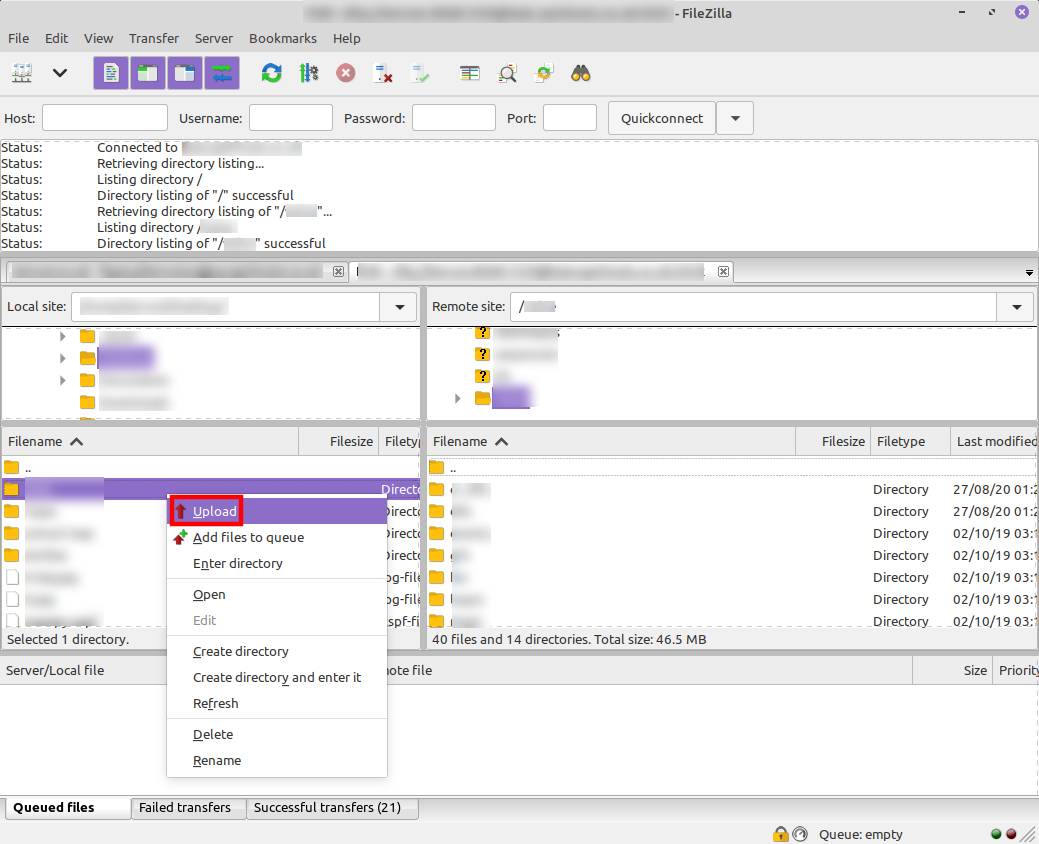
- Once you have finished downloading all the content you wish to transfer, open a new connection by typing the login information for your new host into the same fields mentioned previously in this guide. Then, upload the downloaded content by highlighting the files on the left pane and right-clicking and then press Upload.
- You will now have completed a transfer of your files from an old/current host to your new one! If you haven't already, you may need to change your DNS or Nameservers of your domain to have your domain work on your new host, most domain providers offer guides for this which you can find by searching through their knowledgebases, or on Google.
File Manager
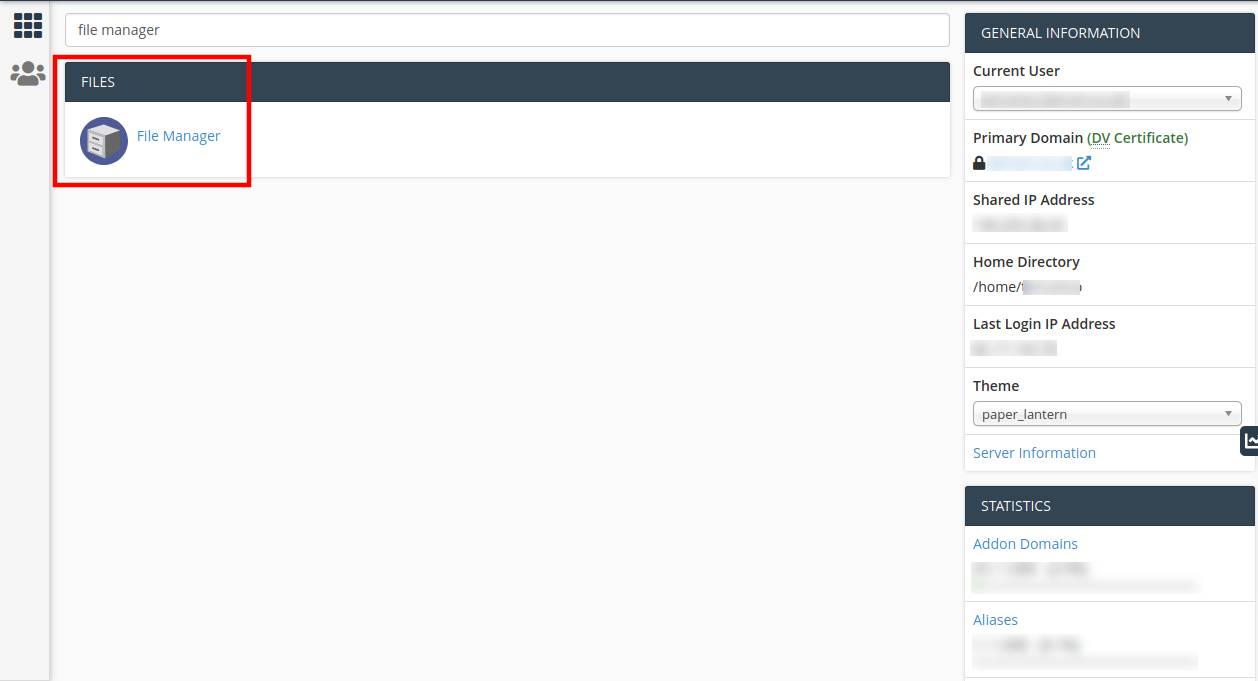
- To transfer files to Web Hosting through File Manager, make sure you are logged into cPanel and find the File Manager application from the main screen when you first login to cPanel.
- Once File Manager is open, I recommend compressing your data before you download it if your current host allows it, to make it much easier and quicker to download. Not only will you save bandwidth doing this, but you will only need to download one file too! First select all the files and folders you want to download, and then right-click on any of the selected files, and press Compress.
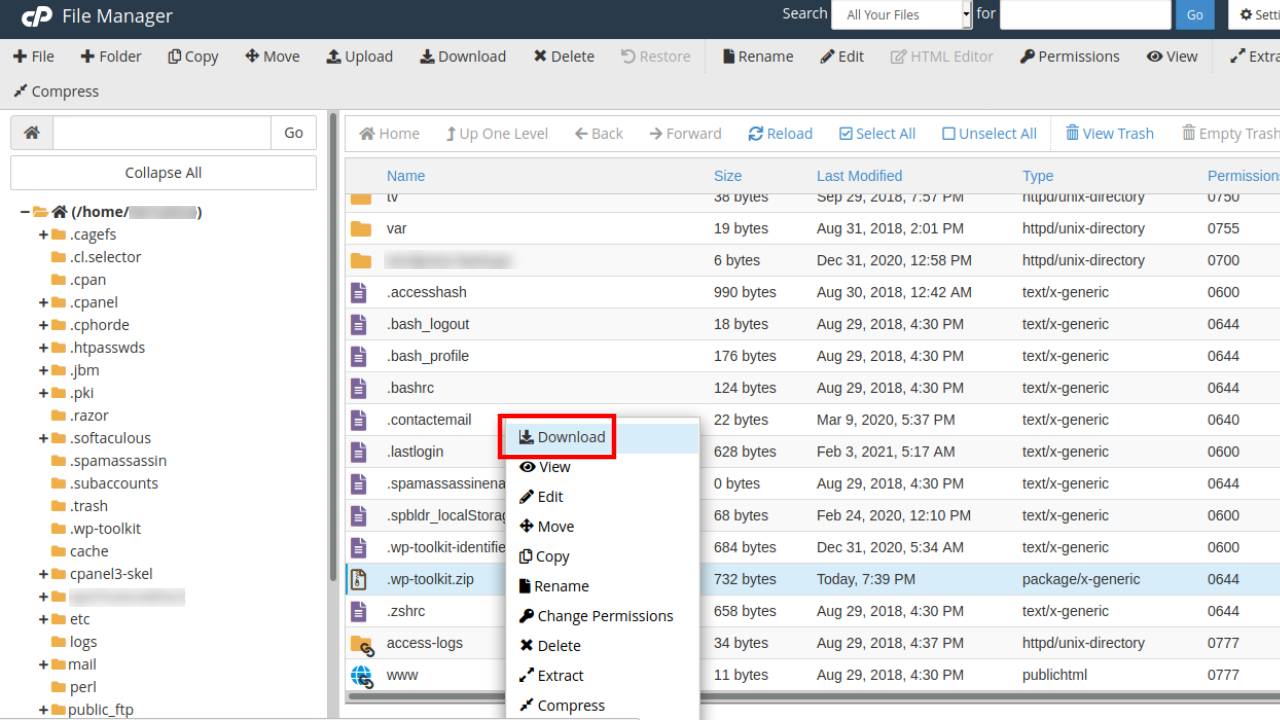
- Once the compression is complete, you can then download the newly created archive by right-clicking on it, and pressing Download. Your browser should then start downloading the archive onto your computer.
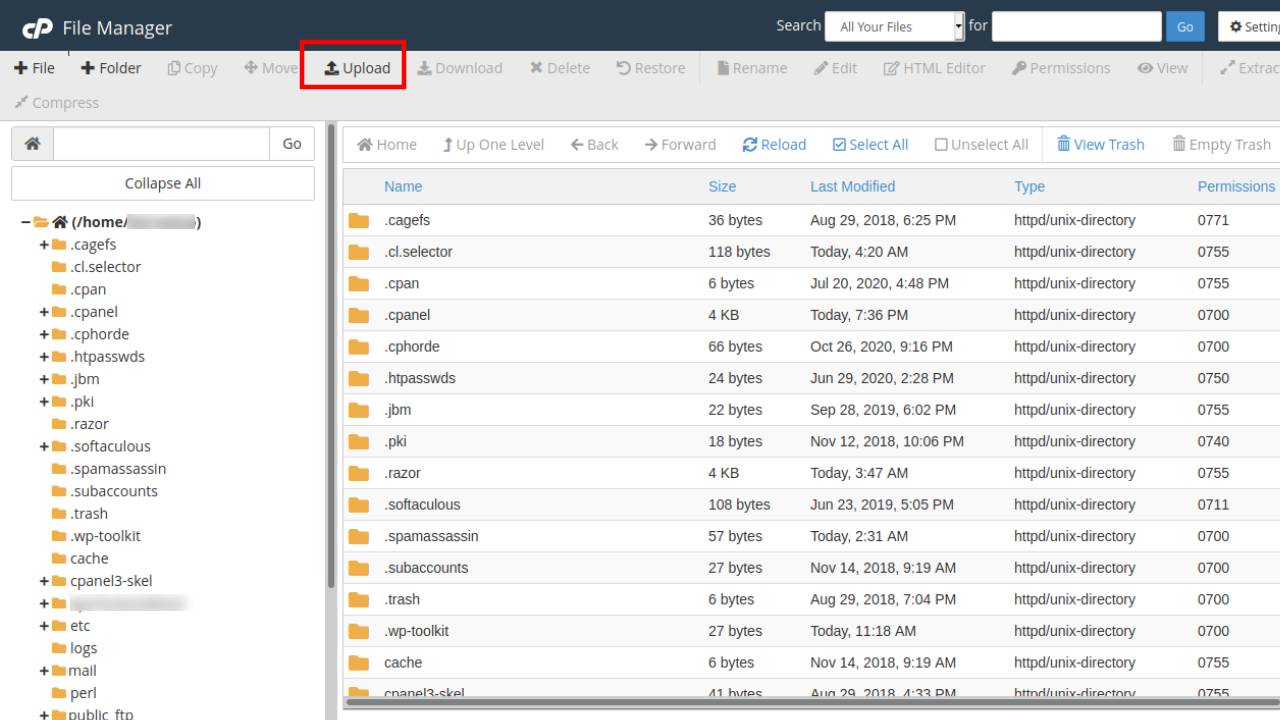
- You can then upload the archive to your new host through File Manager using a similar method. Once you are logged into cPanel and have File Manager open, press the Upload button.
- Then press Select File and find your recently downloaded archive, or drag-and-drop the archive onto the Drop files here to start uploading box.
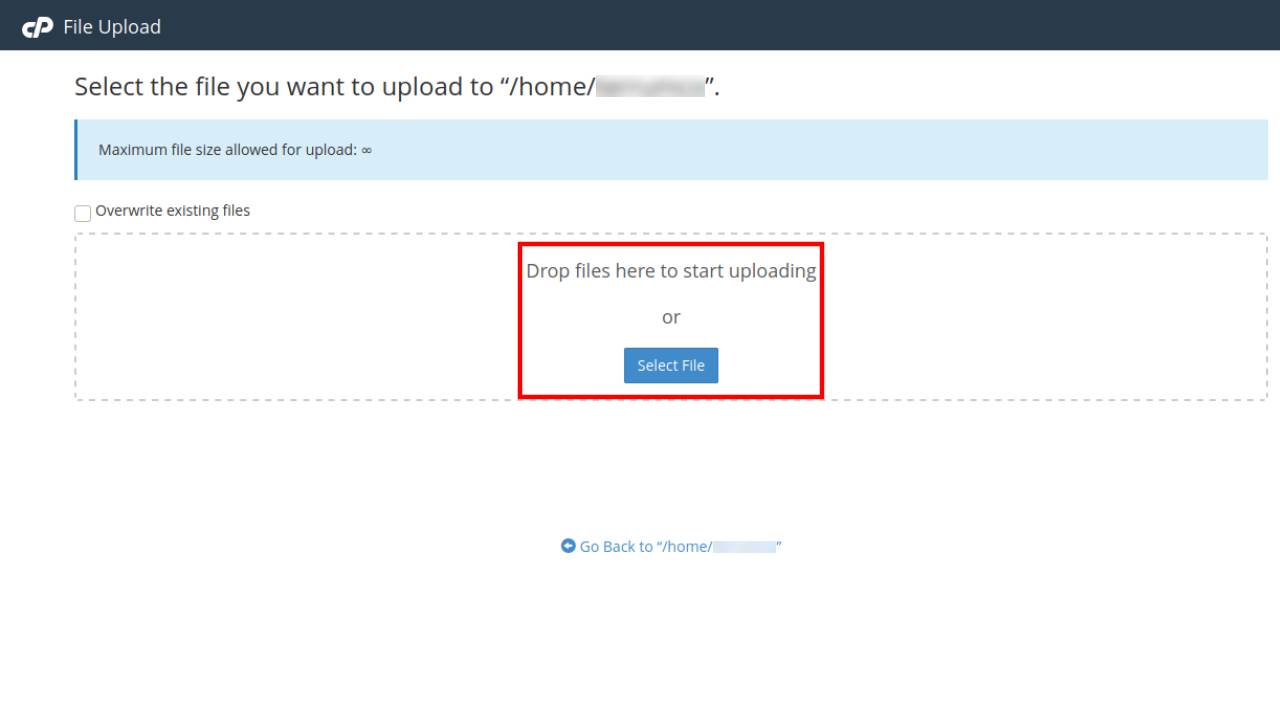
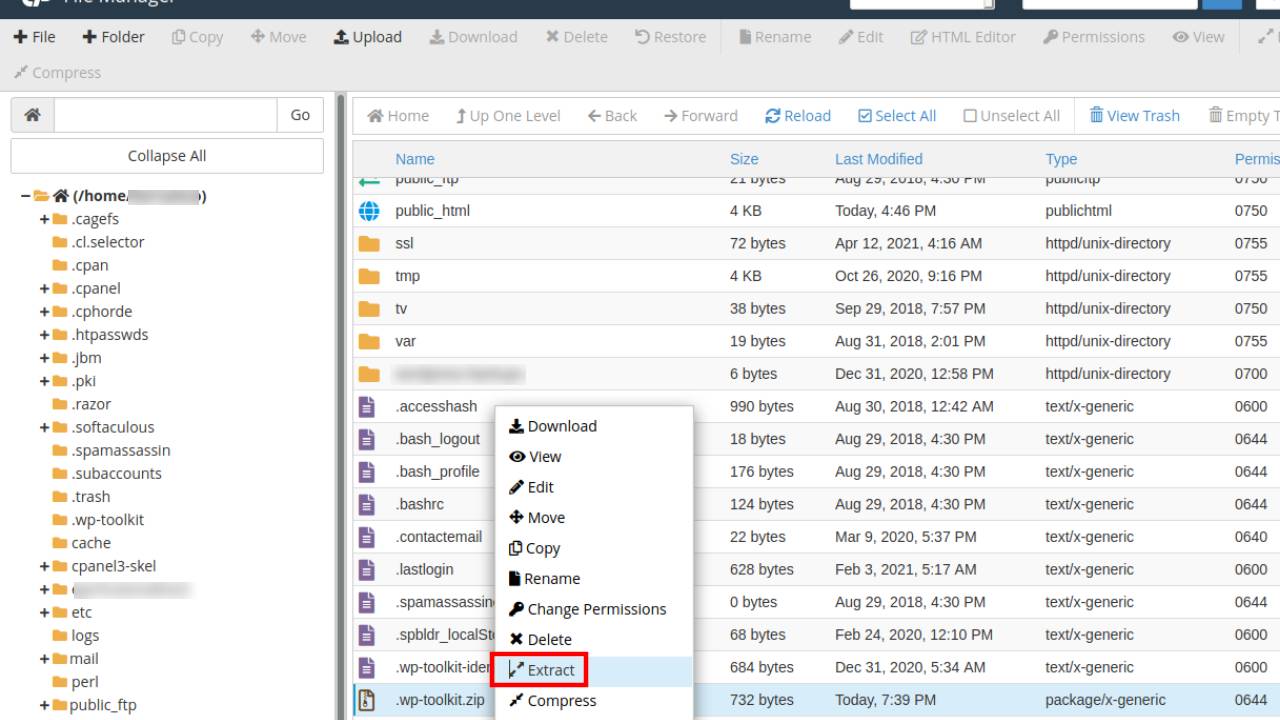
- Once it has finished uploading, press Go Back and then extract the archive by right-clicking on it and pressing Extract. Choose the location you want it extracted to.
- You will now have completed a transfer of your files from an old/current host to your new one! If you haven't already, you may need to change your DNS or Nameservers of your domain to have your domain work on your new host, most domain providers offer guides for this which you can find by searching through their knowledgebases, or on Google.
Transfer Files to VPS Hosting
To transfer files to a VPS Host, I can recommend two ways to do this. If you are using a Windows VPS alongside Remote Desktop, you can share your hard-drive, so long as your client/software supports it. Otherwise, you can use FTP.
Share Your Hard-Drive (Windows & Remote Desktop only)
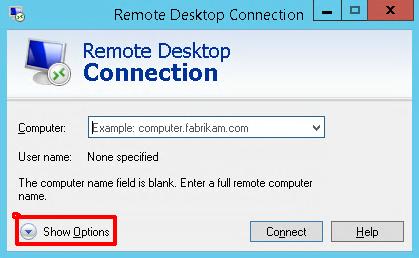
- I will be using Microsoft Remote Desktop Connection for this guide. To transfer files to a VPS Host by sharing your hard-drive, open remote desktop and then press 'Show Options'.
- Press the 'Local Resources' tab, then press 'More...'.
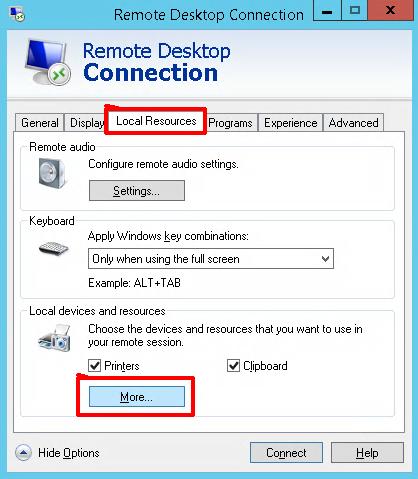
- Press the '+' button next to Drives and select the drive that you wish to share.
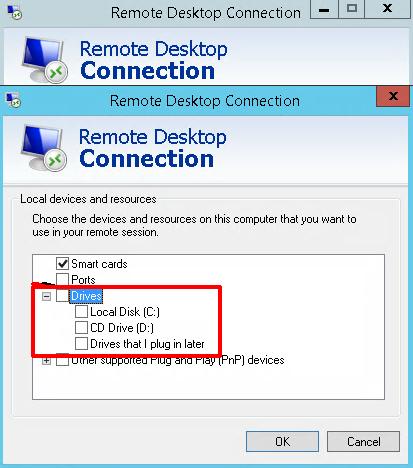
- Press 'OK' and then connect to the VPS. You should then see the drive alongside all the other drives on the VPS, in the 'Computer' application.
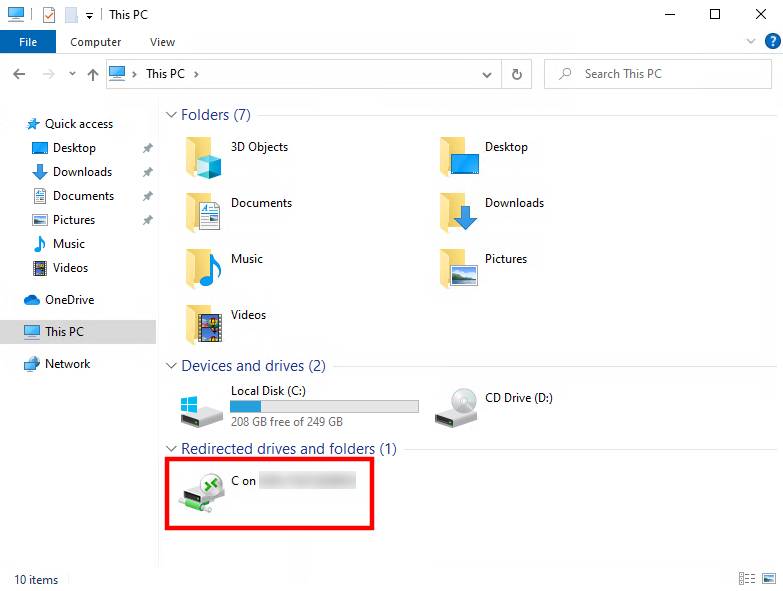
- Now you can transfer any content from the VPS to the shared drive on your computer. Once you have done this, disconnect from the VPS and now enter the new VPS information that you wish to transfer the content to, ensuring that the drive is still shared with the new connection.
- You can now transfer any data back and forth between your computer and the new VPS, including the data you have just downloaded from your old VPS!
FTP (Windows)
- To transfer files to a VPS Host using FTP, I would recommend using FileZilla. You will be required to install FileZilla FTP Server onto any one of the VPS, and FileZilla FTP Client onto the other VPS.
Download FileZilla FTP Server from here: https://filezilla-project.org/download.php?show_all=1
Download FileZilla FTP Client from here: https://filezilla-project.org/download.php?show_all=1&type=server
- When installing FileZilla FTP Server, make sure to keep all settings and values as default. This way you are sure to have a clean setup that would be accurate to this guide. When you are asked to 'Enter server to administrate', simply press Connect.
- Once you have installed and got FileZilla FTP Server open on one of the VPS, press the icon on the top bar that looks like one head in front of a computer.
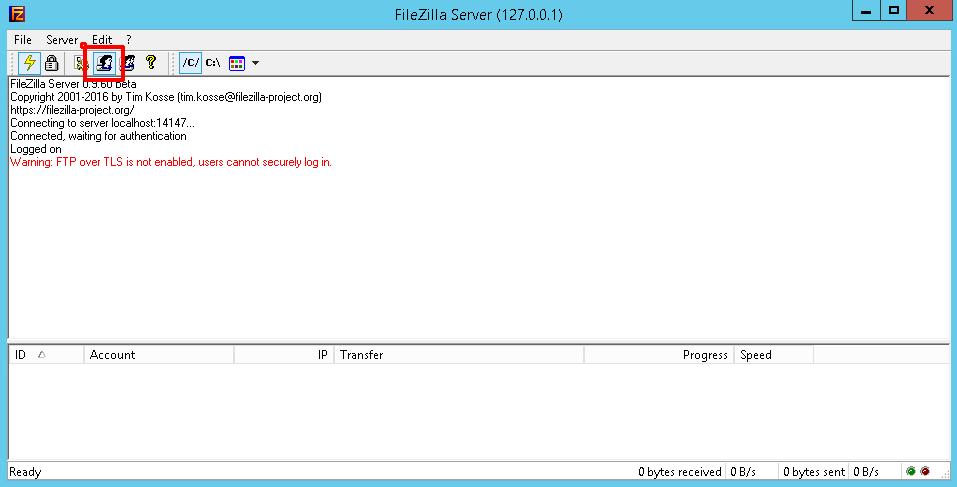
- This will bring up the 'Users' window. On the right-hand side, press 'Add'. Then type a username of your choice into the text field. Then press 'OK'.
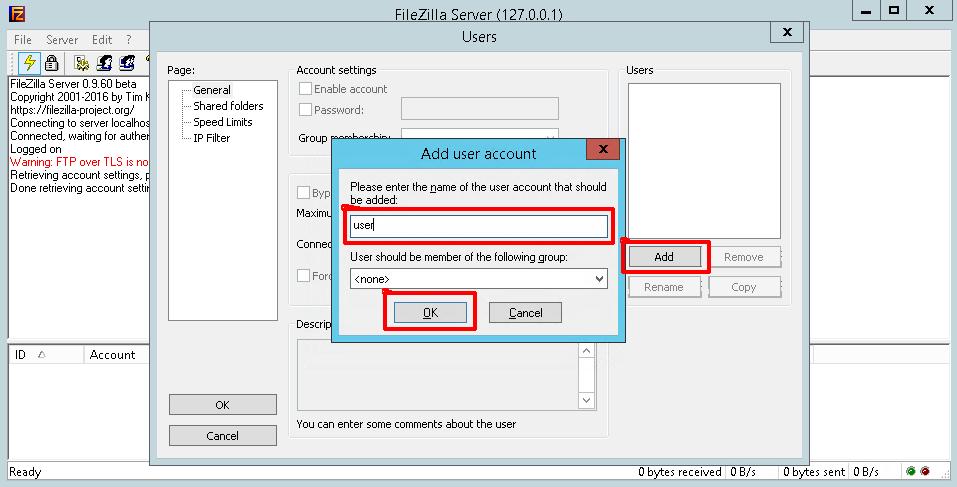
- Press the checkbox next to the 'Password' text field, then type the password of your choice into the text field.

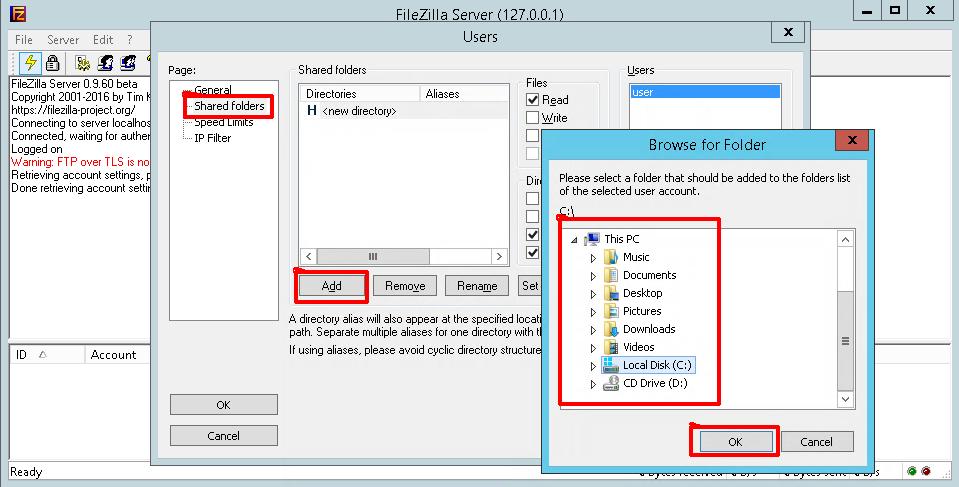
- Next, click on the 'Shared folders' tab on the left-hand side of the 'Users' window. Then press 'Add' in the 'Shared folders' pane. Choose the folder you want to be accessible by the FTP user access. Then press 'OK'.
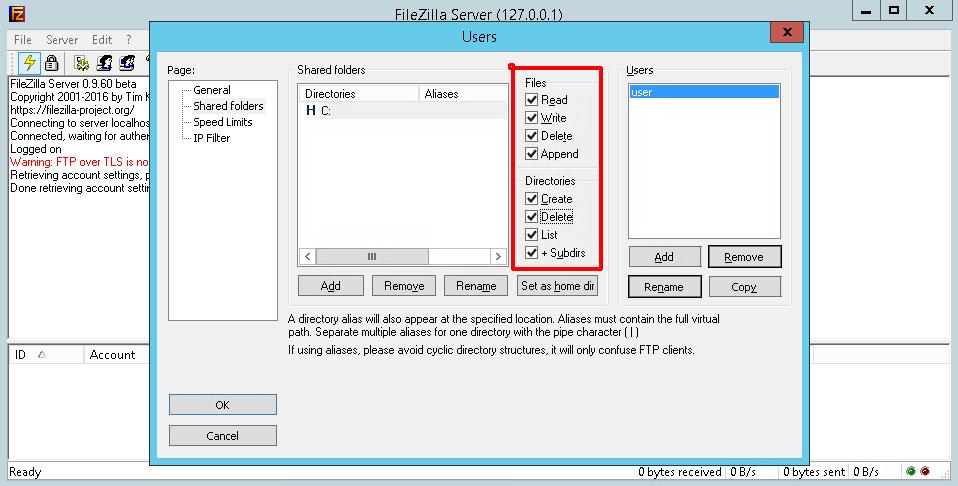
- Select ALL the checkboxes in the 'Files' and 'Directories' pane. This will give the FTP user all permissions. You may alter these permissions as you see fit but please do it with caution to avoid giving too little permissions for this guide to proceed. Then press 'OK'.
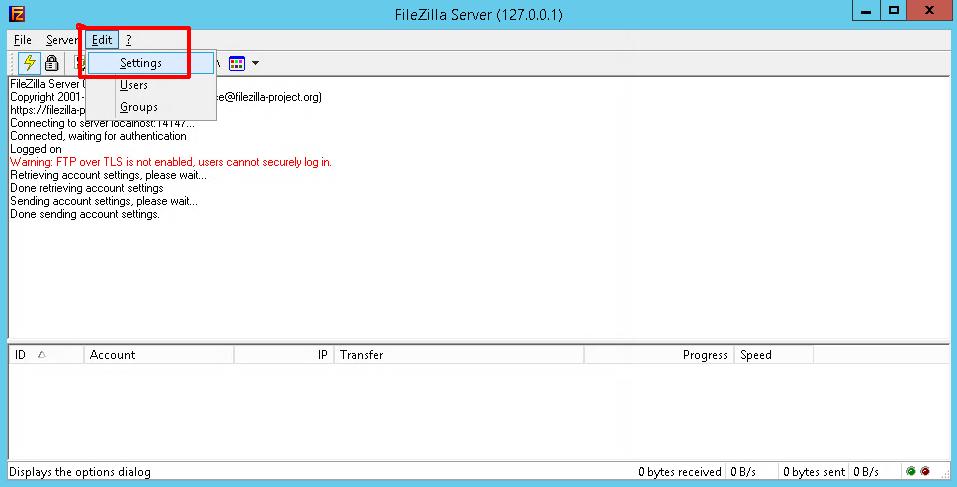
- It is recommended to allow Passive mode for a successful connection. To do this, press the 'Edit' button on the top-bar menu, then press 'Settings'.
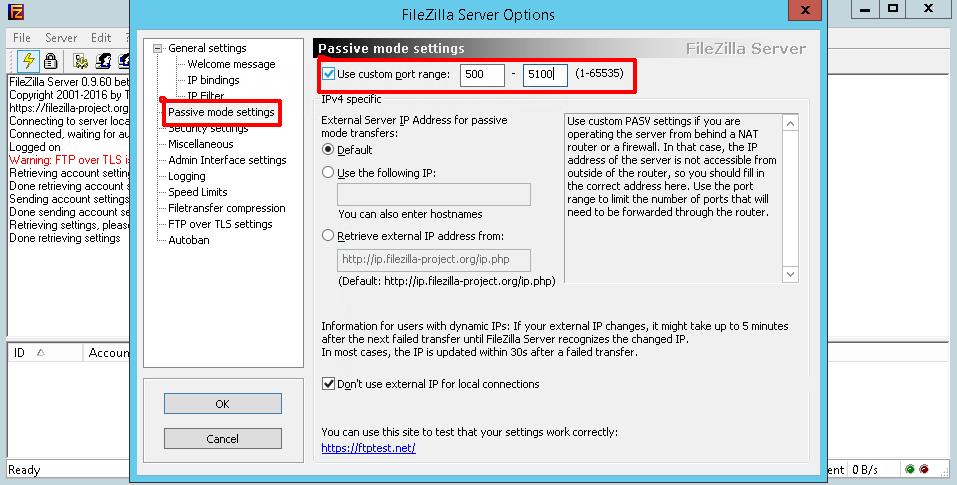
- Press the 'Passive mode settings' bar. Select the checkbox named 'Use custom port range' and type 5000 into the left textbox, and 5100 into the right textbox. Then press 'OK'.
- If you are behind a firewall, you will need to open ports. Please ask your host for help with this, or use this guide if you are only required to open ports through Windows Firewall: How to open ports on Windows Firewall | Server 2012/2016/2019. Open port '21' along with the range 5000-5100.
- Now move to the VPS with FileZilla FTP Client installed. On the Quickconnect bar at the top, enter the VPS IP into the 'Host' field, then the username and password accordingly. Then press 'Quickconnect'.
- If all is done properly, you should now be successfully connected to the VPS which has FileZilla FTP Server installed onto it, and you should see the content that you gave permission to when creating the FTP user on the other VPS. You can now transfer content back and forth between each VPS!
SFTP (Linux)
- If you have SSH (Secure Shell) access to your VPS, you should be able to transfer files to and from your VPS already through SFTP. I would strongly recommend using this instead of FTP if possible.
- To access SFTP from Linux, simply type the following command: sftp username@IP replacing the username and IP accordingly.
- To access SFTP from Windows, I recommend using FileZilla FTP Client, downloadable here: https://filezilla-project.org/download.php?show_all=1, and entering the IP into the Host field, the username and password accordingly, and 22 into the Port field.
FTP (Linux)
- To transfer files to a VPS Host using FTP, I recommend installing 'proftpd' from your distro's appropriate software manager. If you are running Debian/Ubuntu, use this command: sudo apt install proftpd. If you are running CentOS, use this command: sudo yum install proftpd. For this guide, I will use Debian/Ubuntu.
- Allow ProFTPD to run as a service and start every time your machine boots by running the following command: systemctl start proftpd && systemctl enable proftpd
- The location of the configuration file for ProFTPD is: /etc/proftpd/proftpd.conf. You can change the port, default location, allow root access etc from this file. I would strongly recommend using SFTP instead if you want to use FTP for root access.
- To create FTP accounts, they will be shared between Linux user accounts, therefore use the following commands: useradd username and passwd username, replacing username in both instances with the same username of your choice. Then set the user's home directory by typing the following command: usermod -m -d /var/www/ username, replacing username with the same username written above. Then restart ProFTPD by typing the command: service proftpd restart.
- To access the FTP Server, type the command: ftp username@IP changing the username and IP accordingly. Press ENTER and type the password of the account you assigned previously.
- You are now connected to the FTP server from a Linux command-line. You will be required to understand FTP commands at this point, however if you are looking for a more user-friendly client, I would recommend using a Windows client named FileZilla FTP client, downloadable here: https://filezilla-project.org/download.php?show_all=1 and use the IP/Host, username, password and port '21' to access the FTP Server from FileZilla FTP Client.
- If you are behind a firewall, and want to allow remote access to the FTP server, you will need to open ports. Please ask your host for help with this. If you are only behind a software firewall such as iptables, use this command to open port '21': iptables -I INPUT -p tcp --dport 21 -j ACCEPT. Then save the rules permanently if MySQL is accessible successfully from a remote location: iptables-save >/etc/sysconfig/iptables.
As always I hope these guides are written clearly and easily enough for everyone to understand, but as everyone has different levels of experience, and each host offers varied features, it is not possible to write a guide that suits every requirement. So if you are stuck or want to be sure your data is safely transferred, you can always contact us and we will give you one-to-one support on transferring all your data to us at no extra charge!
If you are looking for Website Hosting, VPS Hosting, Game Server Hosting or Radio Server Hosting - give us a try! Contact us today to receive an unbeatable quote and start a whole new project with us today, or transfer your current one to us!May 1, 2021